Percept Software Installation Guide
Preparing the Percept Software Environment
Thank you for choosing Blickfeld Percept. In this chapter we will guide you through the necessary steps in the Percept software installation process.
Minimum Hardware Requirements
Percept and the applications you can create with Percept and your Blickfeld LiDAR are very versatile and therefore the hardware requirements will differ depending on your use case. Our recommendation is:
-
CPU: Intel i5/i7 or AMD Ryzen 5/7
-
RAM: 8/16 GB
-
SSD/HDD: 512 GB
-
Network: Gigabit-Ethernet
Supported Operating Systems
Currently we support Windows 10 (with WSL2) and Ubuntu Linux (18.04 and 20.04).
In order to run Percept you need to install Docker first on your operating machine. The following section will guide you through this process.
| As the Percept Architecture is based on Docker, there is a chance that it will run on your favorite Linux Distribution, too. |
How to install Docker
Percept is provided to you as a Docker container. A Docker container can be compared to a virtual machine and is executed on the host by the Docker daemon.
The Percept container contains all necessary programs, algorithms and binaries to acquire, process and visualize point clouds. The provided Percept web interface lets you easily create, configure, start and visualize projects.
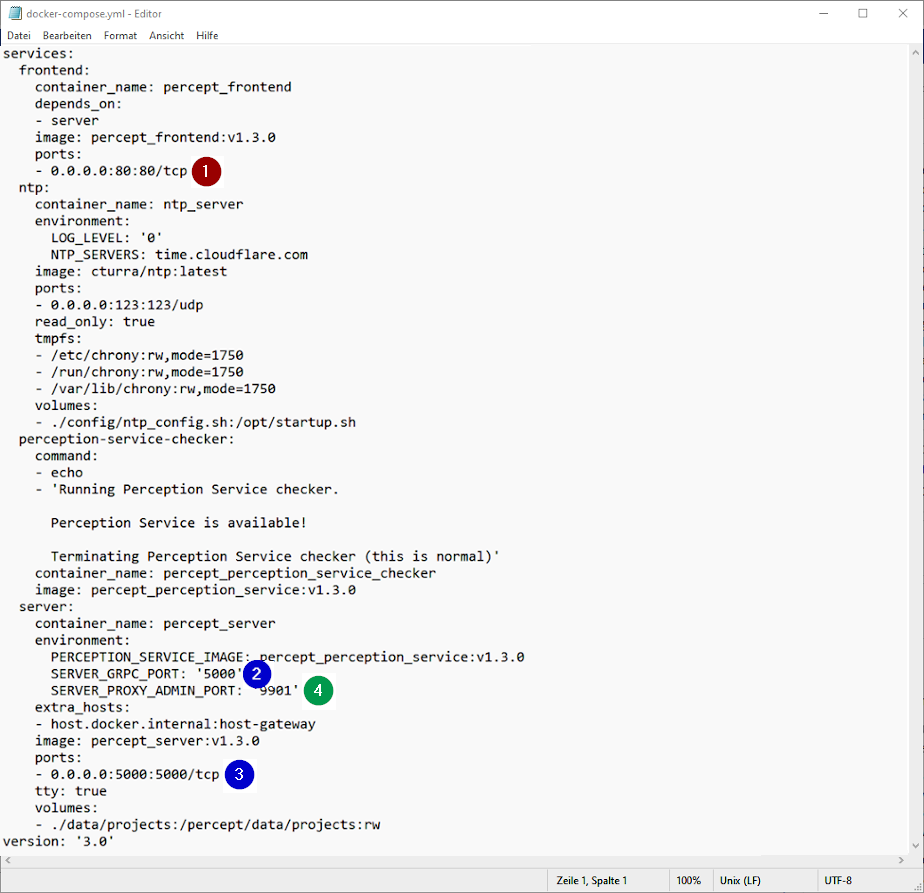
Ports used by Percept
Percept will use the following Ports for communication. Some of them can be configured by the user in the provided docker compose file, while some of them are fixed and cannot be changed.
| It can happen, especially on Windows based systems that another system resource or application is using Port 80. Therefore, the frontend will not start. If this is the case for you set another port used for the frontend in the docker-compose file (docker-compose.yml). |
| Port | Configurable |
|---|---|
80 |
can be changed in the docker-compose file |
9901 |
can be changed in the docker-compose file |
5000 |
can be change in the docker-compose file |
58080 |
cannot be change, ask the Blickfeld Team for further information |
How to change the ports used by Percept
You can change some of the Ports used by Percept by editing the docker-compose.yml file.
The Web interface uses port 80. To use port 3000 instead of 80, replace e.g. 0.0.0.0:80:80/tcp with 0.0.0.0:3000:80/tcp in the frontend section of the docker-compose.yml (see the line is marked as (1) in Port Settings in the docker-compose.yml file). Note that all port mappings start with 0.0.0.0:. This is required to achieve valid docker port mappings with network interfaces using IPv6 IPs.
In the server section of the docker-compose.yml you can change the Port 5000 and 9901.
If you want to change port 5000, replace SERVER_GRPC_PORT: '5000'
with your port of choice and also the line 5000:5000/tcp, e.g.
SERVER_GRPC_PORT: '5050' and 5050:5050/tcp both lines are marked with (2 respectively 3) in Port Settings in the docker-compose.yml file
To replace the port 9901, find the line SERVER_PROXY_ADMIN_PORT: '9901'
and replace it with your port of choice e.g. SERVER_PROXY_ADMIN_PORT: '9980'
marked as (4) as shown in Port Settings in the docker-compose.yml file.
Windows
To run Percept on Windows you will need to have Docker and the Windows Subsystem for Linux 2 short WSL2 setup on your PC.
-
To install Docker on Windows please follow this recipe from the official Docker website:
After installing Docker, the "Docker Desktop" Application should be available and the docker command should be executable inside the Windows Command Line Tool as cmd-prompt.
If your version of Windows supports WSL2 (Windows subsystem for Linux) we recommend enabling and using it as a backend for Docker for Windows.
Docker for Windows detects if your system is capable of using WSL2. Follow the steps in the Docker GUI to install and enable WSL2. Further information can be found on the Docker website: Docker WSL2 integration
| If WSL2 is not installed Docker is using the Hyper-V backend to execute containers which might lead to lower performance in compute-heavy or IO-intensive applications. |
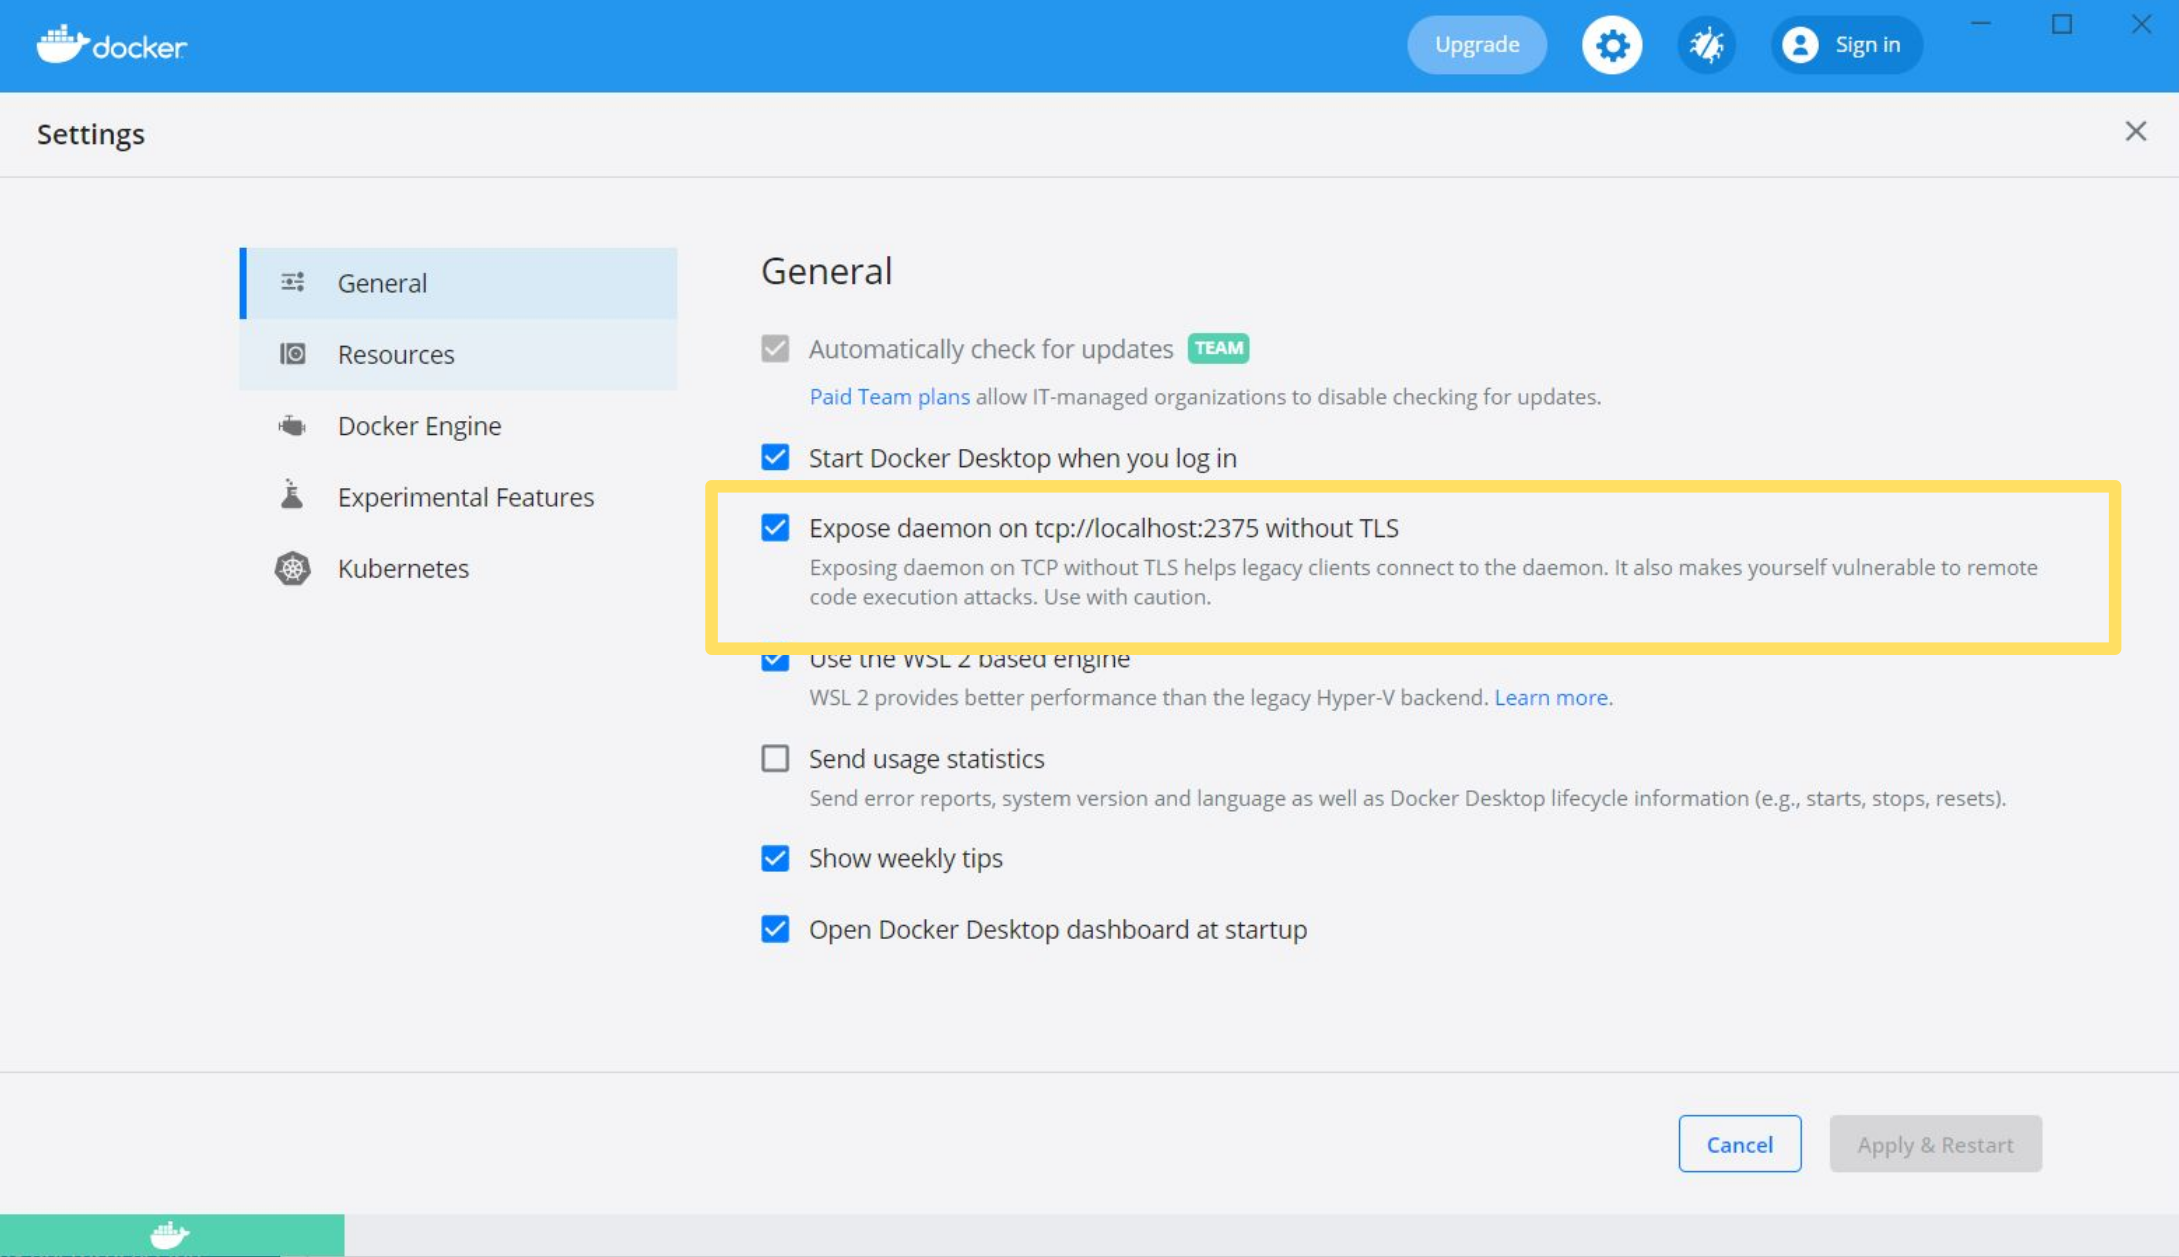
Since the Percept containers communicate with TCP between each other, we require to enable
Expose daemon on tcp://localhost:2375 without TLS in the Settings of the Docker Desktop GUI as shown in the following image:
To finish the installation of Docker, please reboot your PC.
Linux
Ubuntu
To run Percept you will need to install Docker on your Ubuntu machine.
-
To install Docker on Ubuntu please follow this recipe from the official Docker website (We tested it with "install using the repository"):
The Percept containers communicate with TCP with each other, therefore we have to enable TCP without TLS on localhost:2375. This is also needed for some Docker volumes to share data between Percept and your PC, e.g. to save Project-Settings.
For your convenience we included a configure.sh script in the zip folder of Percept (needs root permission). Please follow the steps to configure Percept:
|
The command |
-
sudo ./configure.sh user your_user_name(replaceyour_user_namewith your user name) -
sudo ./configure.sh docker -
sudo ./configure.sh volumes
Percept also requires docker-compose. You can either install it with apt install docker-compose
or by following the docker documentation Install Docker Compose
To finish the installation of Docker, please reboot your PC.
Required Docker Version
|
Please make sure that you have at least the docker version 20.10.XX on Windows you can check the version either
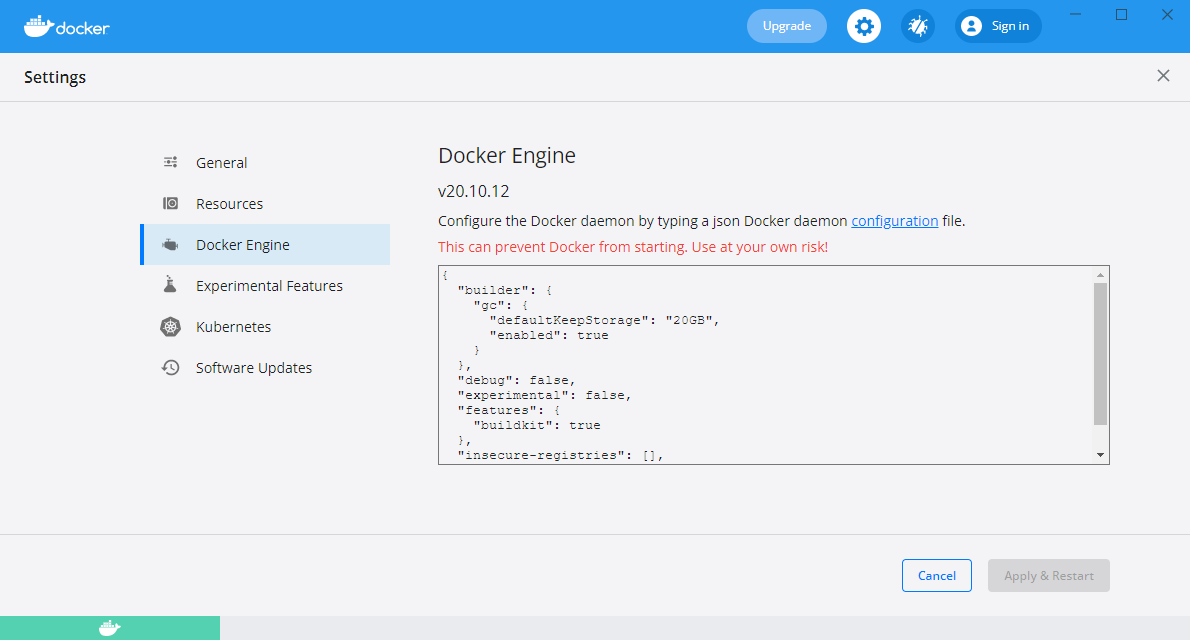
Figure 4. Image shows the docker version (in the docker engine section) denoted as v20.10.12
on Ubuntu
|
How to install Percept
If you have Docker installed and set up, we can now load the Percept image into the local Docker registry.
| These steps are the same for Windows and Linux |
-
Extract the downloaded archive and navigate to the folder:
-
for Percept licensed version:
cd Downloads/blickfeld-percept-v1.x.x_licensed/blickfeld-percept-v1.x.x_licensed -
for Percept trial version:
cd Downloads/blickfeld-percept-v1.x.x_trial/blickfeld-percept-v1.x.x_trial
-
-
Load the Percept image into the local Docker registry by executing the following command on the command line:
-
docker load -i percept-v1.x.x.tar.gz
-
-
To make sure, that the image was loaded correctly, check the Docker image registry contents (the output should be similar to the one shown in the image List of Docker Images below, the "TAG" depends on the Percept version used):
-
docker images
-

| Loading the Percept image into the docker registry might take some time |
How to start Percept
After setting up Docker on your machine and loading the Percept image into the Docker registry, you are ready to go and use Percept.
| If you want to re-use projects from old Percept versions with a new Percept release, please look at the section How to migrate Percept projects. |
| The docker-compose file lists all services, exposed ports and mapped folders. It will start the server, frontend and the NTP-server. In Addition, the server will also start an envoy-proxy to allow the communication between the frontend and the server. |
| Percept will automatically start Docker containers if required, e.g. when you run multiple projects at the same time. |
| The NTP container is started to provide a possibility to time synchronize the devices via NTP. You may want to remove this part from the docker-compose file, if you have your own NTP server running. You will learn more on when to use time synchronization in later chapters. |
Windows
-
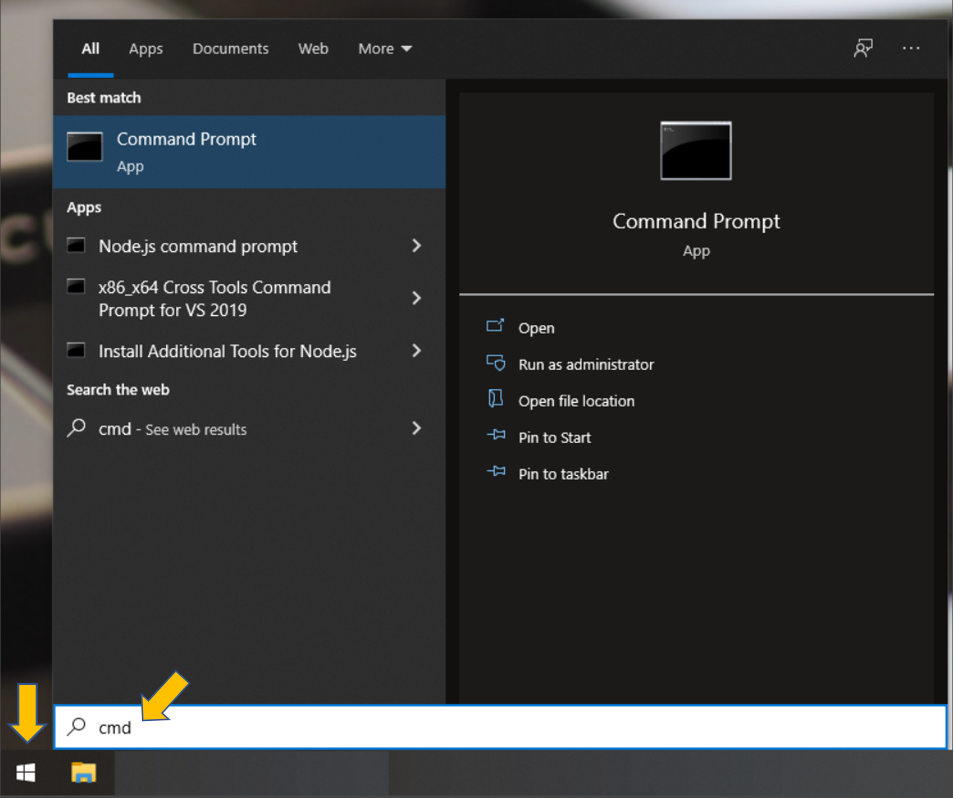
To start Percept you have to open up the Windows Command Line Tool (You can do this by typing in cmd in the window start popup and hit enter).
-
Inside the command line tool you have to navigate to the folder you downloaded and extracted Percept using the appropriate command line tool commands (e.g. "cd download" for changing from your user home directory to the download directory, see screenshot).
-
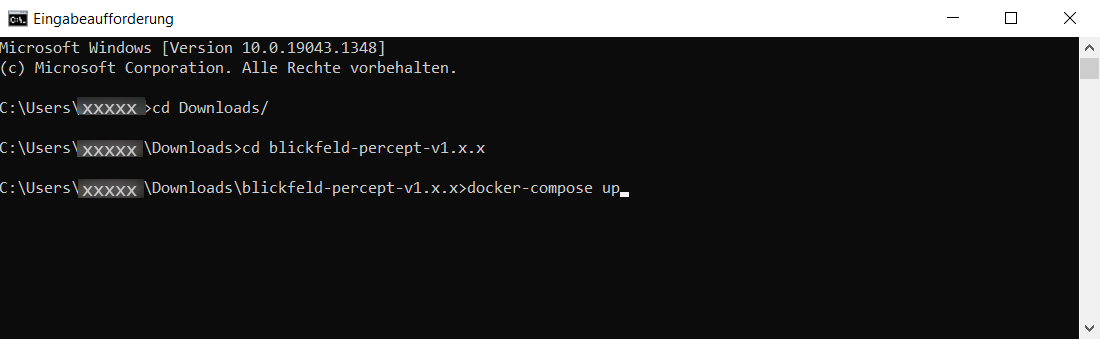
Once you are inside the Percept directory type in and execute the following command:
-
docker-compose up
-
-
Windows might ask for permission to share local directories. To make sure Percept runs as intended click on "Share it"
-
Open a web-browser and access the Percept web interface.
Ubuntu
-
To start Percept execute the following command inside the Percept directory
-
docker-compose up
-
|
Running an upgraded Percept version
After upgrading Percept to another version, errors might occur when you try to start Percept. This can be resolved by removing stopped containers. Type |
How to access the Web Interface
-
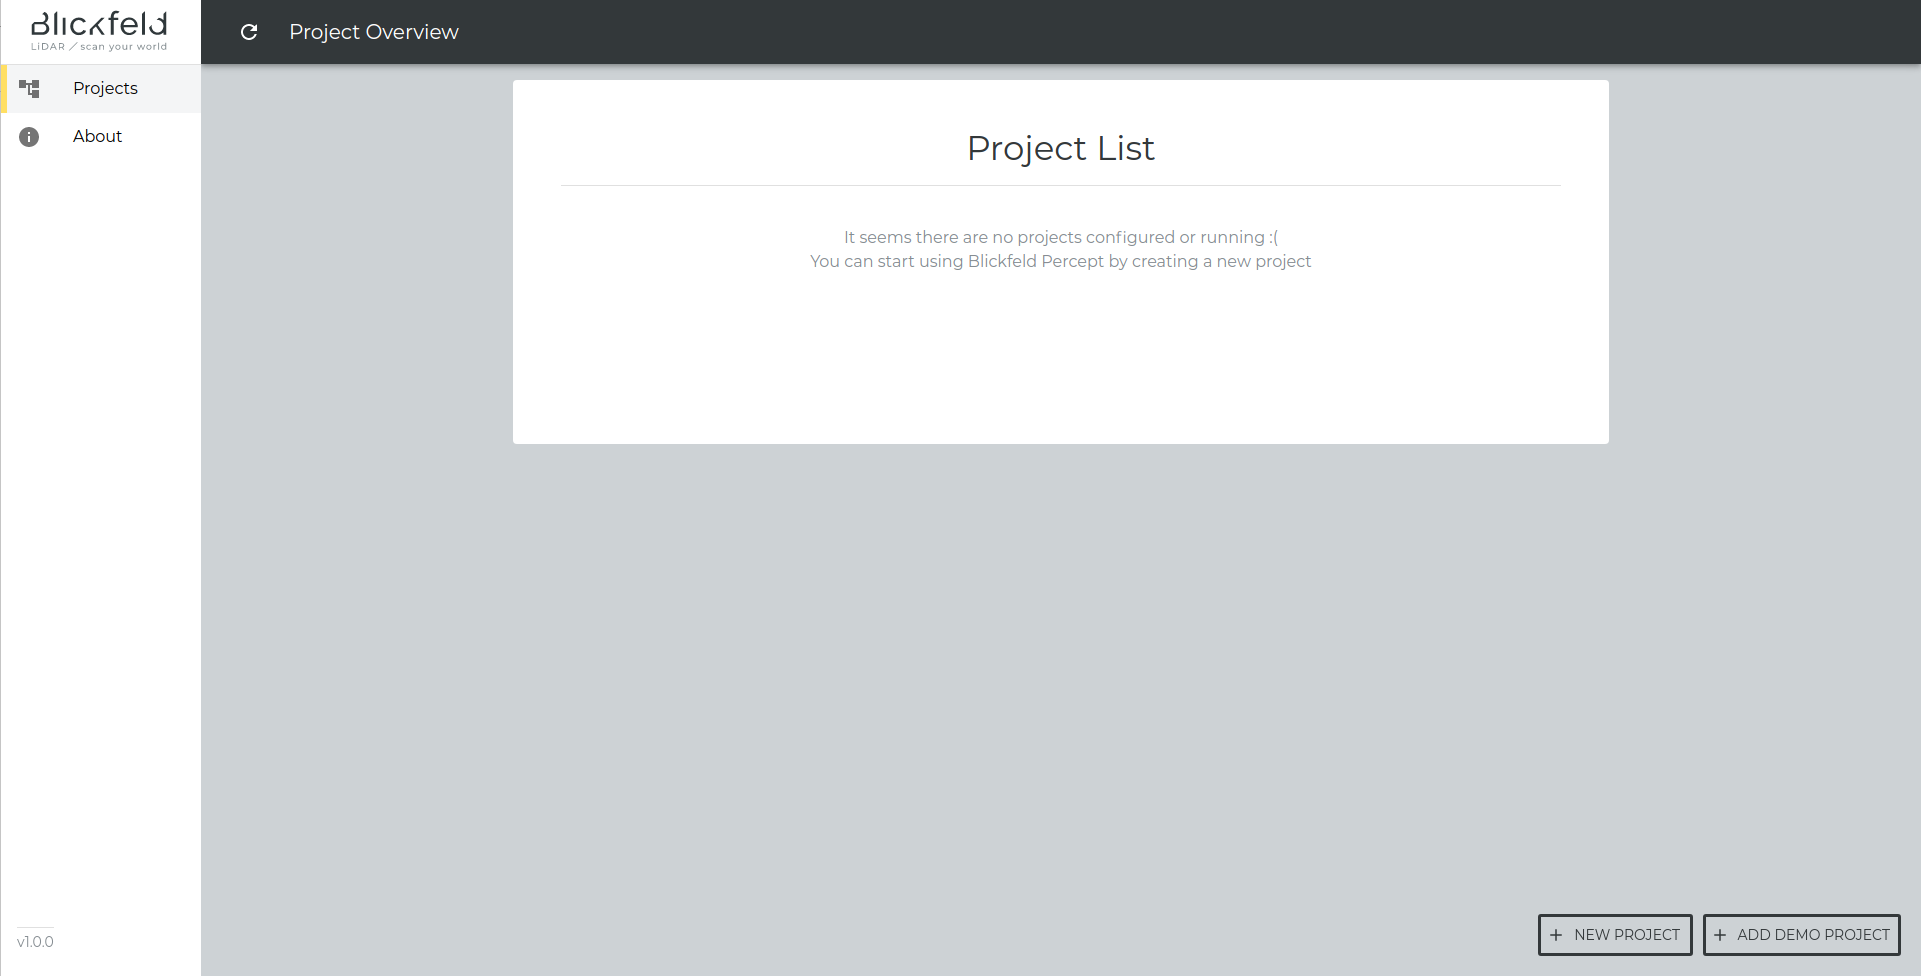
To access the Web Interface of Percept open a web-browser and enter
-
http://localhost/ or http://127.0.0.1:80/ and you should see the Percept start screen as shown in the image below
-
How to upgrade Percept
The following steps will guide you through the upgrade process:
-
Stop any running Percept version
-
To keep your projects created with a previous version of Percept, copy the content of the directory of your old Percept version
blickfeld-percept-v1.x.x_licensed/data/projectsto the directory of your new percept versionblickfeld-percept-v1.x.x_licensed/data/projectse.g. fromblickfeld-percept-v1.1.0_licensed/data/projectstoblickfeld-percept-v1.3.0_licensed/data/projects -
Remove the images from the old Percept version either by using docker-desktop or the command line:
-
Docker-Desktop:
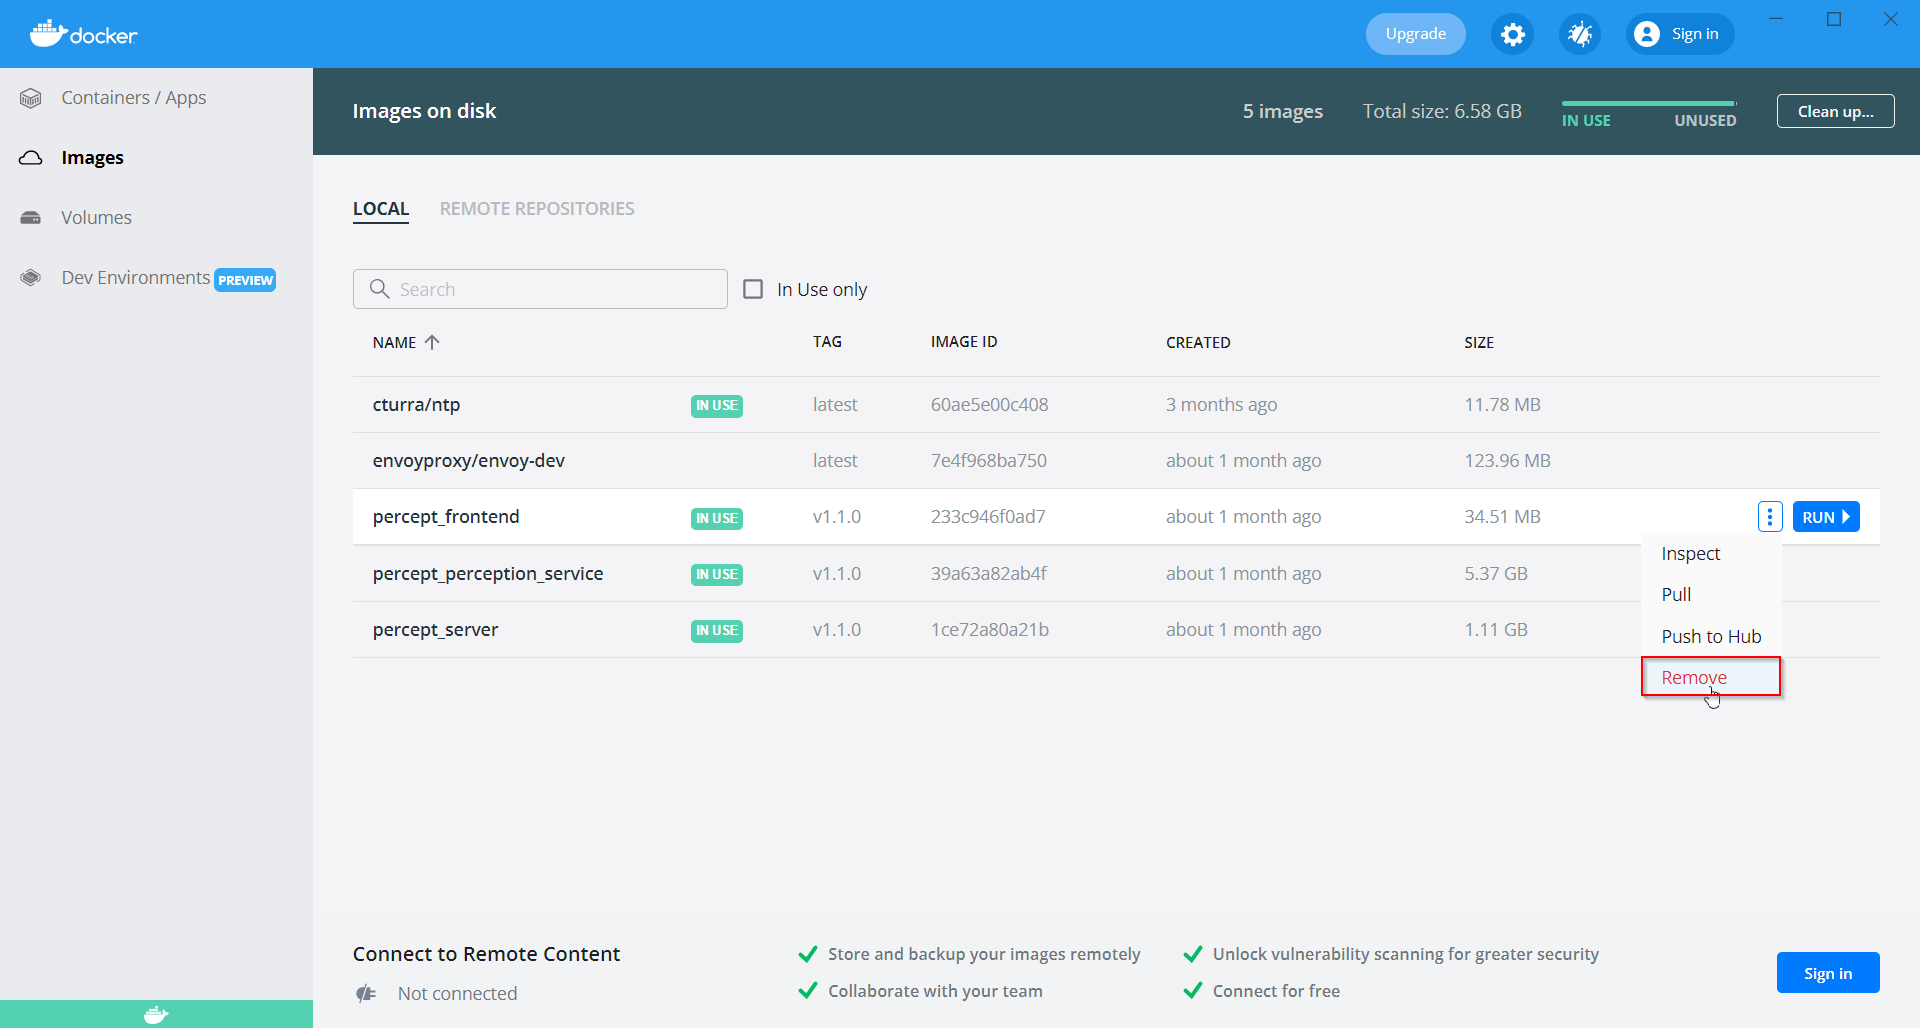
if you use Docker-Desktop first remove the container.
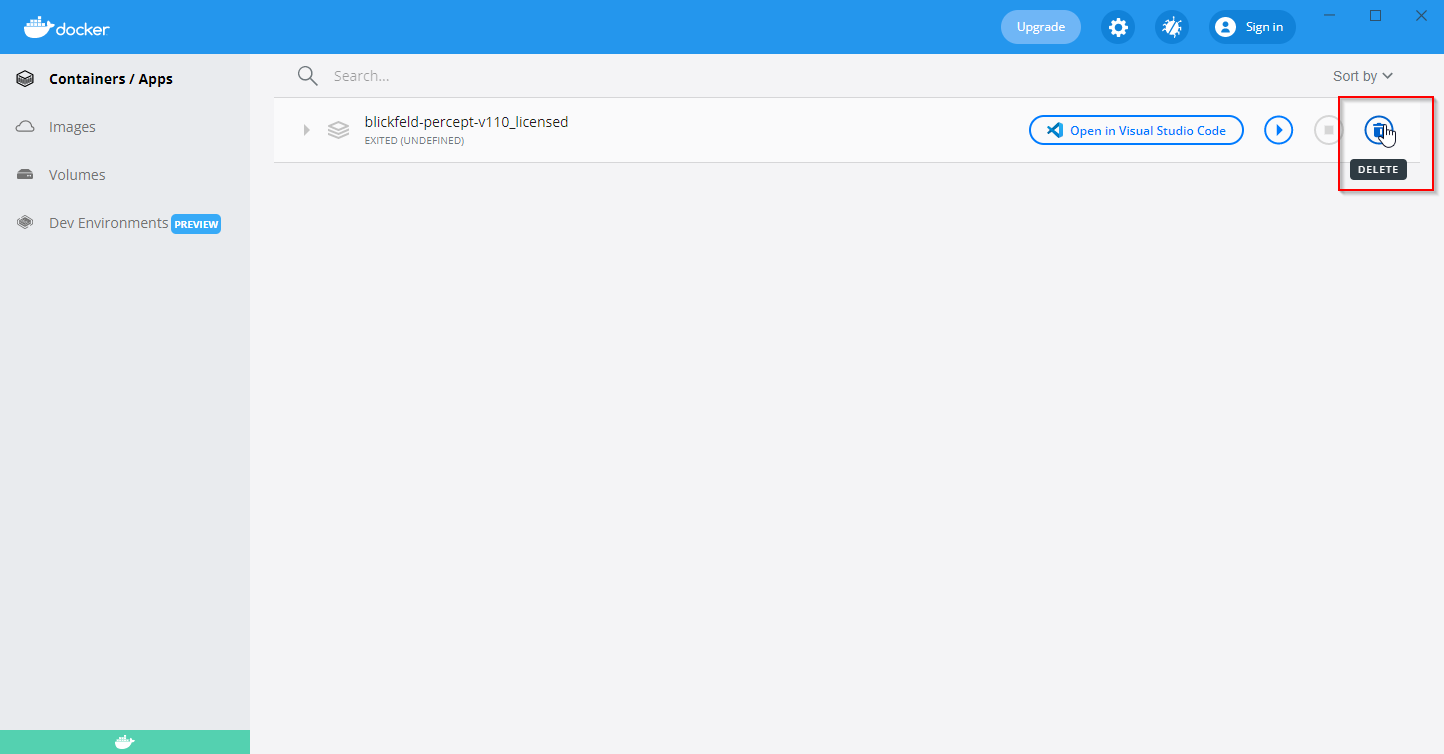 Figure 9. Docker Desktop remove the Percept container
after that you can remove all images in regards to Percept.
Either every single one:
or by selecting
cleanup images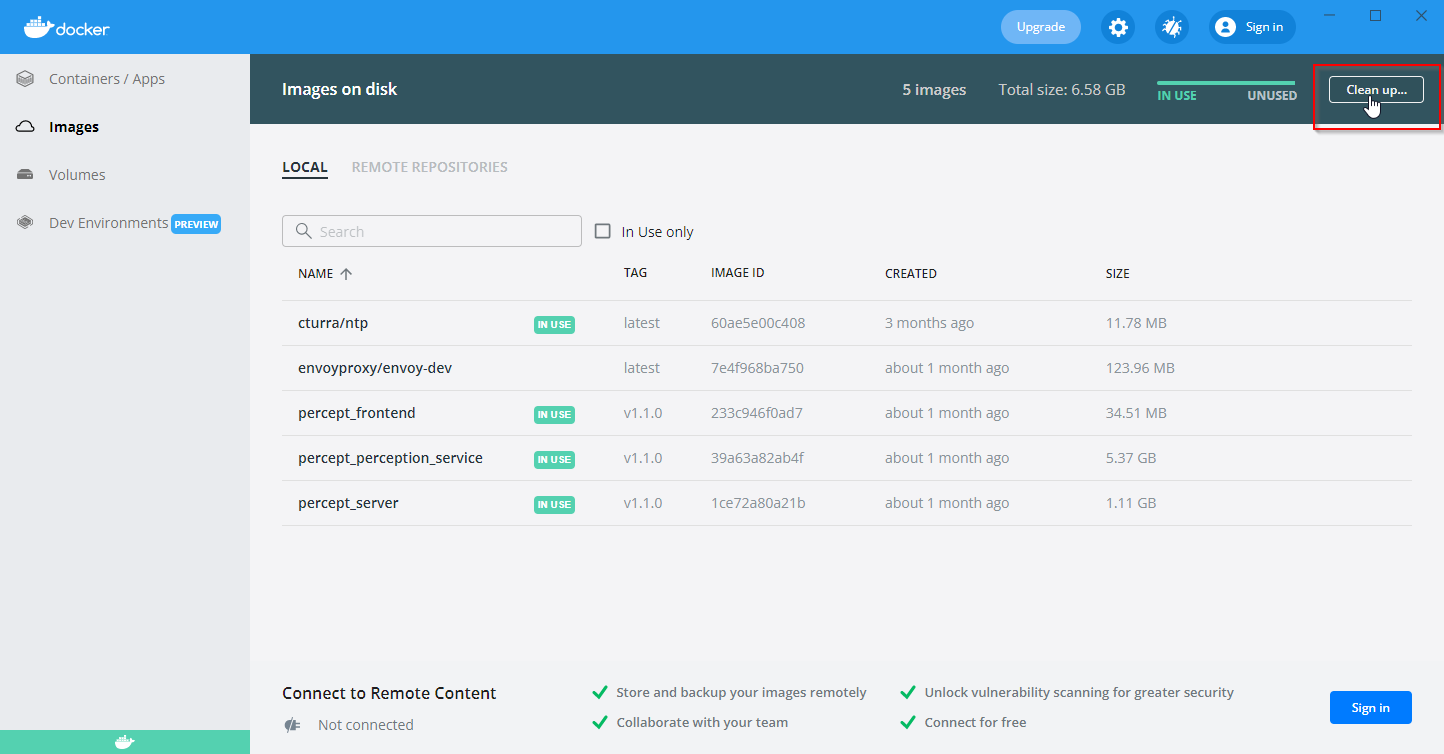 Figure 10. Docker Desktop cleanup images
and selecting all images to remove
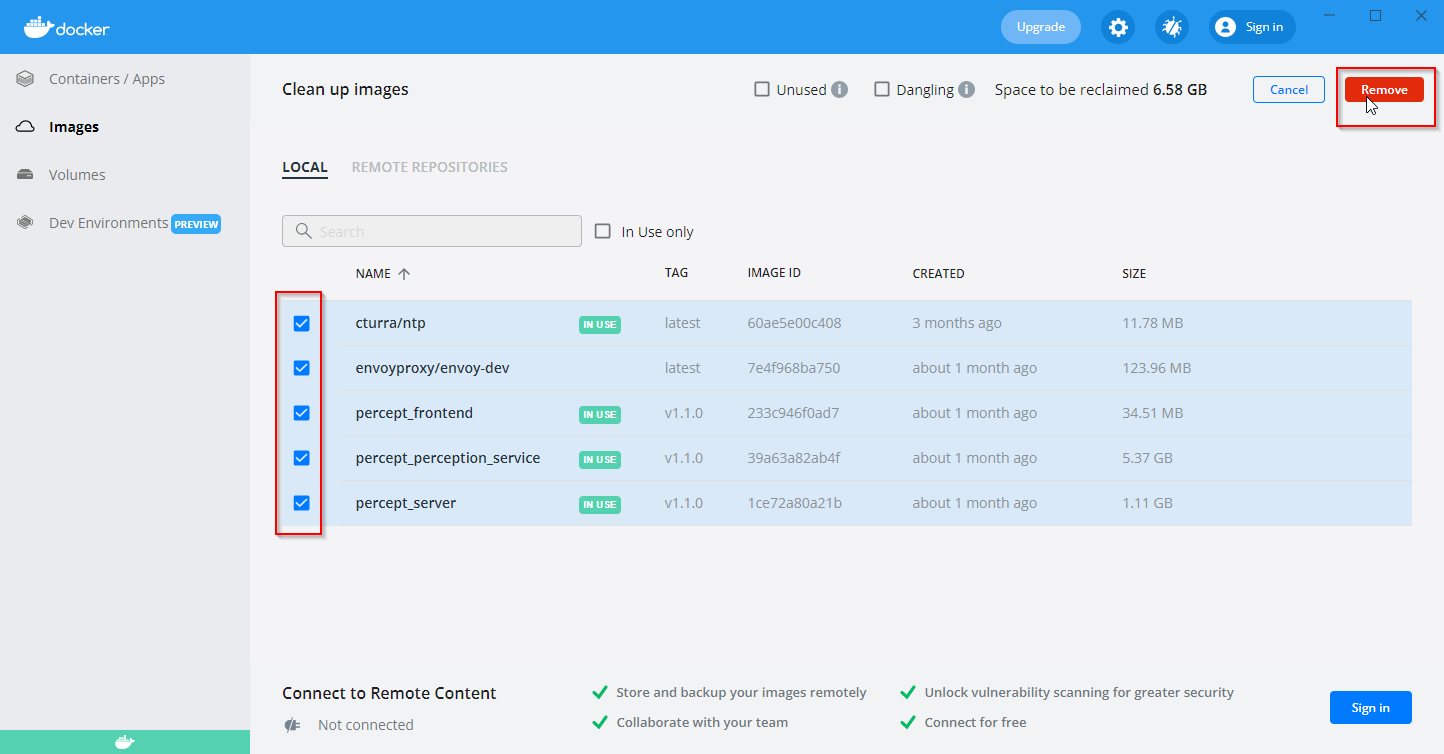 Figure 11. Docker Desktop remove images
If you get an error similar to this one
Error: (HTTP code 409) conflict - conflict: unable to remove repository … (must be force) … container … is using its reference image …. Figure 12. Error removing image because Percept container was not removed first
make sure that you deleted the percept container and try it again or try the command line method.
-
Command line: On the command line, first enter
docker image lsto get a list of all images and an overview of the correspondingIMAGE ID. Then you can calldocker image rm IMAGE IDwith the IMAGE ID from the Percept images.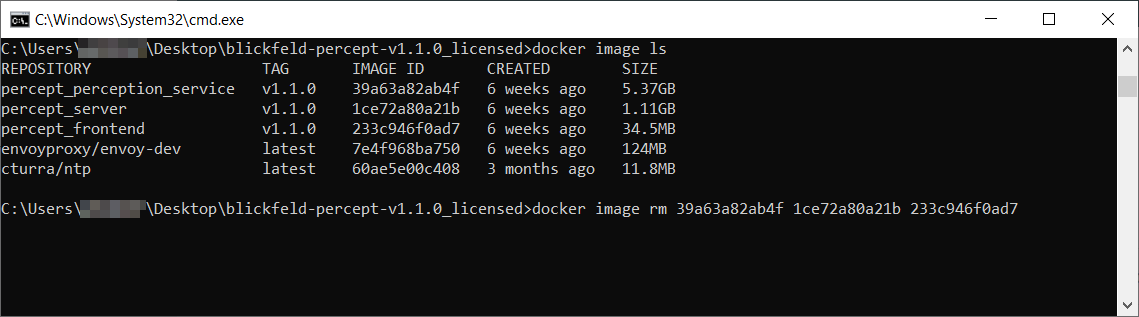 Figure 13. Remove Percept docker images via command line
-
-
Follow How to install Percept of Percept to load and How to start Percept to use the new Percept version.
-
You may need to update your browser cache since some web browser store parts of Percept for a faster experience and therefore you might not see all of the changes provided with the new version. To refresh the cache open Percept in your web browser and press
ctrl + shift + r -
You can remove the directory from your previous Percept version if you don’t need the data/projects of it anymore
-
Follow the How to migrate Percept projects to use your projects copied from a previous Percept version
How to migrate Percept projects
After installing a new version of Percept, you may want to continue using some projects you configured with an older version. In order to do this, first you need to set up Docker, as explained in How to install Docker, and load the Percept image, as described in How to install Percept.
If this is done, you can then follow these steps:
-
The projects you configure are saved in the
data/projectsfolder inside the Percept folderDownloads/blickfeld-percept-v1.x.x_licensed/blickfeld-percept-v1.x.x_licensed(for the licensed version) orDownloads/blickfeld-percept-v1.x.x_trial/blickfeld-percept-v1.x.x_trial(for the trial version). This is the same folder that you used to install Percept in the section How to install Percept. You can copy the projects you want to migrate from thedata/projectsfolder of the old Percept version to thedata/projectsfolder of the new one. -
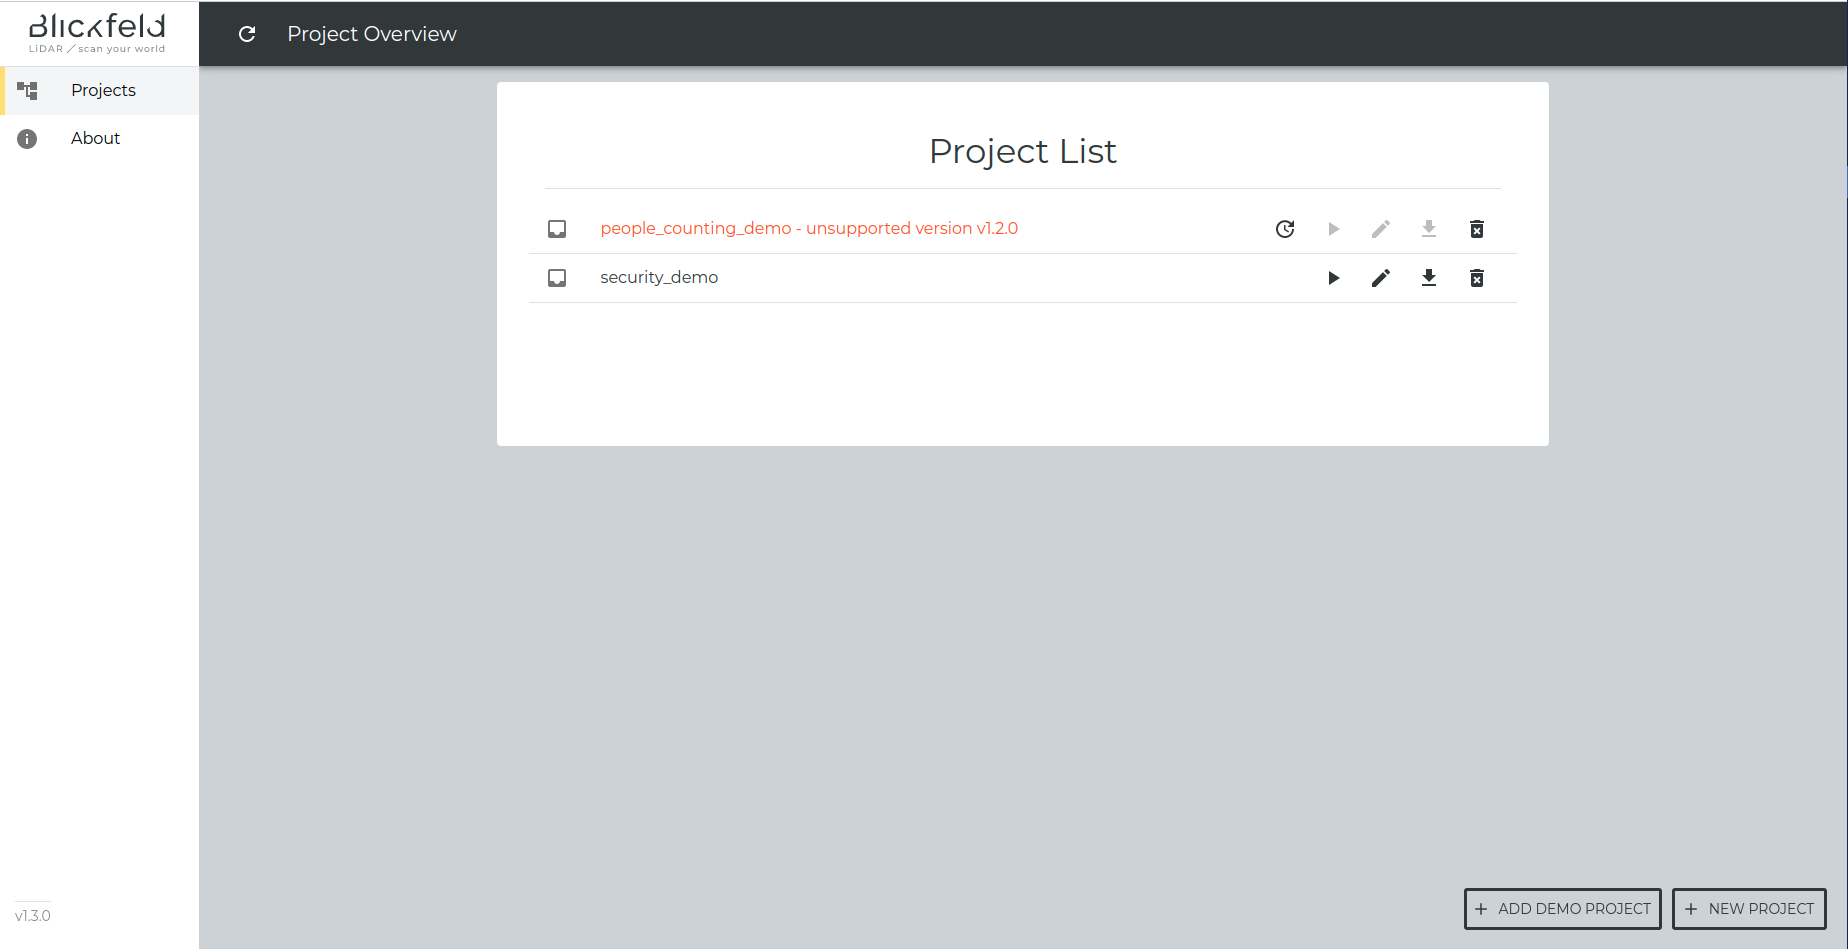
Start Percept as explained in How to start Percept. As you can see in Old projects loaded in Percept, projects created with an old Percept version are colored in red and their buttons are disabled. These projects also have an additional button (the one using the "update" symbol). By clicking on it all the projects will be converted to the current Percept version.
-
The Project Migrator will go through all the projects you copied in the
data/projectsfolder and migrate them one by one to the currently used Percept version. The operation may take a few minutes and its logs are contained in thedata/server_logsfolder. After that, the old projects will no longer be colored in red and you will be able to start using them.
| Note that after clicking on the "Migrate" button, all the projects will be updated to the currently used Percept. Also, note that all projects need to be stopped before starting the migration. |
| The Project Migrator can only update old projects to the currently used Percept. Projects from an even newer version can’t be downgraded. |
The project migrator will create a backup of your projects in 'data/deprecated_projects'. The name of the backup folder is the same as the original one with the addition of the Percept version it is compatible with. It is recommended to keep the original project folder, contained in the data/projects directory of the old Percept version, since the Project Migrator will overwrite its copy created in the new Percept version.
|
[Advanced] Migrating the projects using the Docker container
Another option to migrate the projects to the new Percept version is to directly run the Project Migrator Docker container. Before doing this, please make sure that Percept is currently shut down by stopping any docker-compose up command you may have run. In addition, you can run the docker ps command, which lists the currently running containers. Its output should be empty before running the Project Migrator. If not, please see How to force Percept to stop for more details.
We provide a specific Docker container, called Project Migrator, to migrate the projects from old Percept versions so that you can re-use them in a newly installed one. You can start the Project Migrator by executing the corresponding docker-compose command (you can find more details about how to do it in How to start Percept):
-
docker-compose -f docker-compose-project-migrator.yml up
After having updated all the projects in the data/projects folder, the Docker container will automatically shut down.
You can now start the new version of Percept and run your migrated projects or create new ones.