Bosch
This section provides information on how to integrate QbProtect with Bosch BVMS. Please refer to the ONVIF section beforehand for general information on using ONVIF with QbProtect.
|
The following Bosch BVMS components have been used in the examples below:
|
Add Device
|
Events originating from dynamic event sources (e.g., security zones) have to be correctly exposed to the VMS each time a new zone configuration is introduced via WebGUI. Please either pre-configure all the required security zones in WebGUI before adding the QbProtect into the VMS or re-open BVMS configuration client to populate the event list with event topics from security zones, which have been added in WebGUI once the device was already integrated into BVMS. |
The BVMS Configuration Client is used to add QbProtect into Bosch BVMS.
|
Please make sure that your BVMS setup has the following components active and configured: Video Recording Manager (VRM), Recording Pool, Video Streaming Gateway (VSG), and iSCSI storage. |
The procedure includes the following steps:
-
Launch the BVMS Configuration Client and login using your BVMS password
-
Navigate to
Devicestab →VRM Devices→ Select configured Pool under VRM IP address (in this examplePool 0) → Right ClickStreaming Gateway→ SelectAdd Encoder/camera→ SelectONVIF Encoder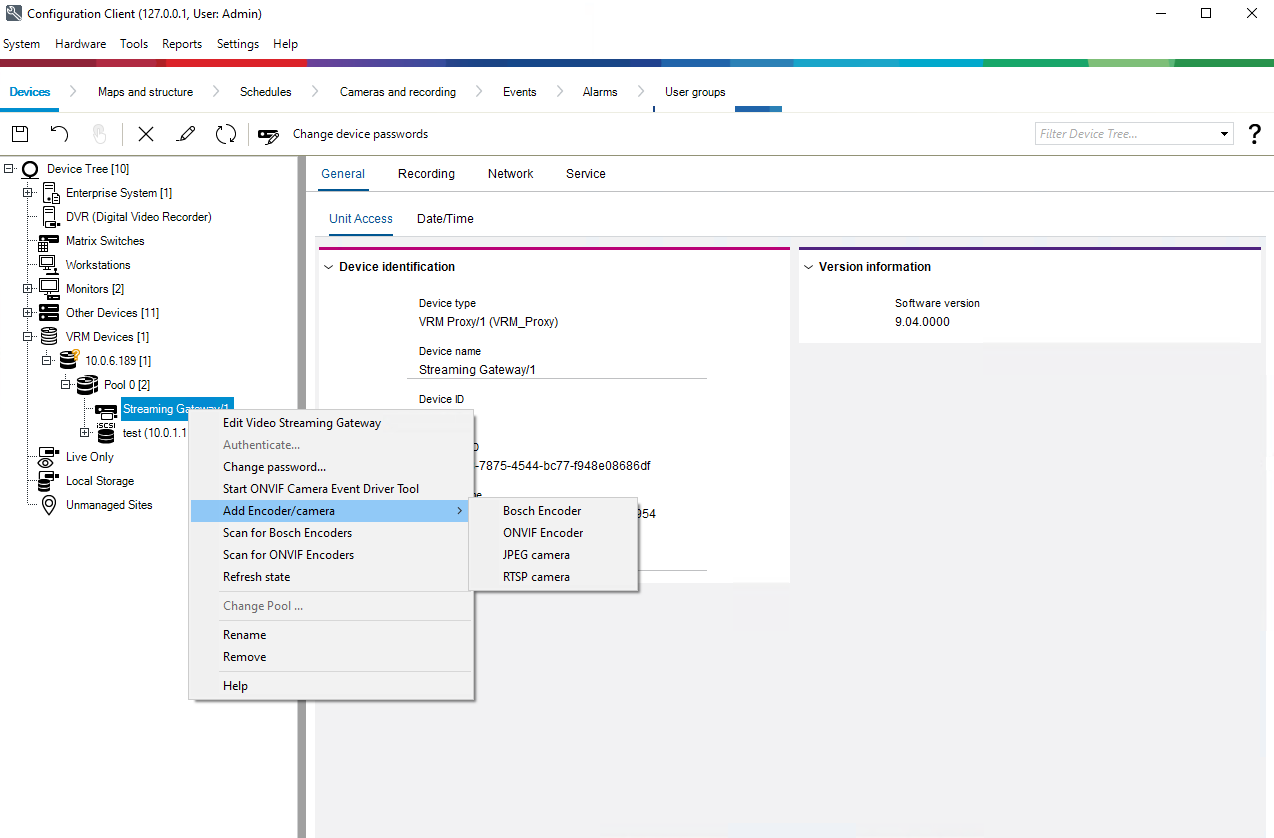 Figure 1. Adding QbProtect into Bosch BVMS: VSG and ONVIF encoder
 -
Give a meaningful name to the device, e.g.
QbProtect→ Enter the IP of QbProtect in theNetwork addressfield → Set port443for encrypted RTSP video stream → ToggleSecure connection→ SetONVIF profiletoProfile T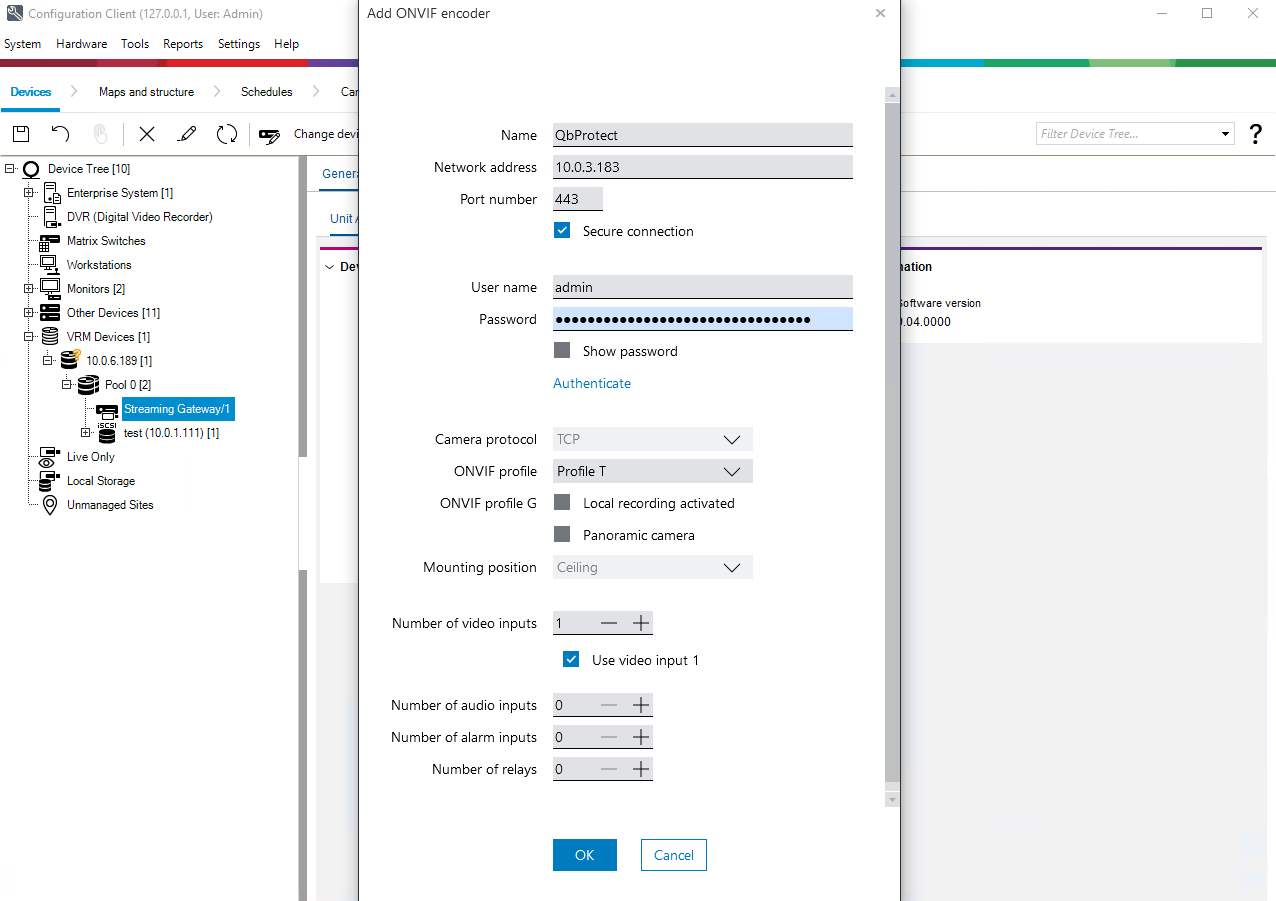 Figure 2. Adding QbProtect into Bosch BVMS: ONVIF profile and credentials configuration
 -
Set
User name/Passwordin the correspondingCredentialsfieldsPlease refer to the User authentication subsection to find out how to obtain valid ONVIF credentials required for QbProtect VMS integrations.
-
Click
Authenticate→ ClickOK Figure 3. Adding QbProtect into Bosch BVMS: successful authentication
 -
Click on
QbProtect→ General information about the discovered QbProtect should be depicted underONVIF Encodertab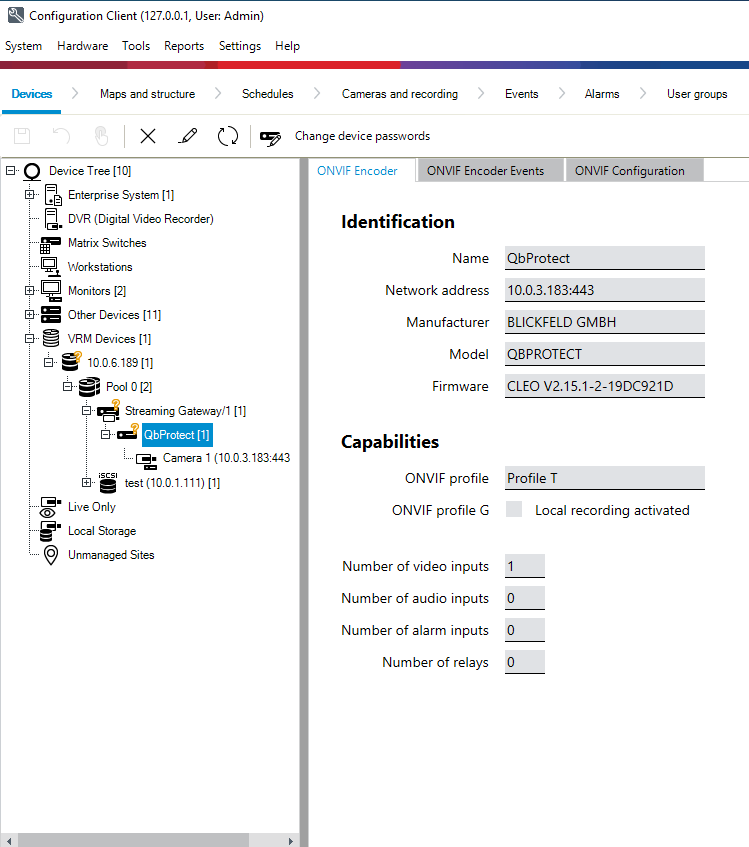 Figure 4. Adding QbProtect into Bosch BVMS: device information
 -
Navigate to
Maps and Structuretab → Navigate toLogical Treetab → Drag and drop QbProtect camera from theDevice Treeto theLogical Tree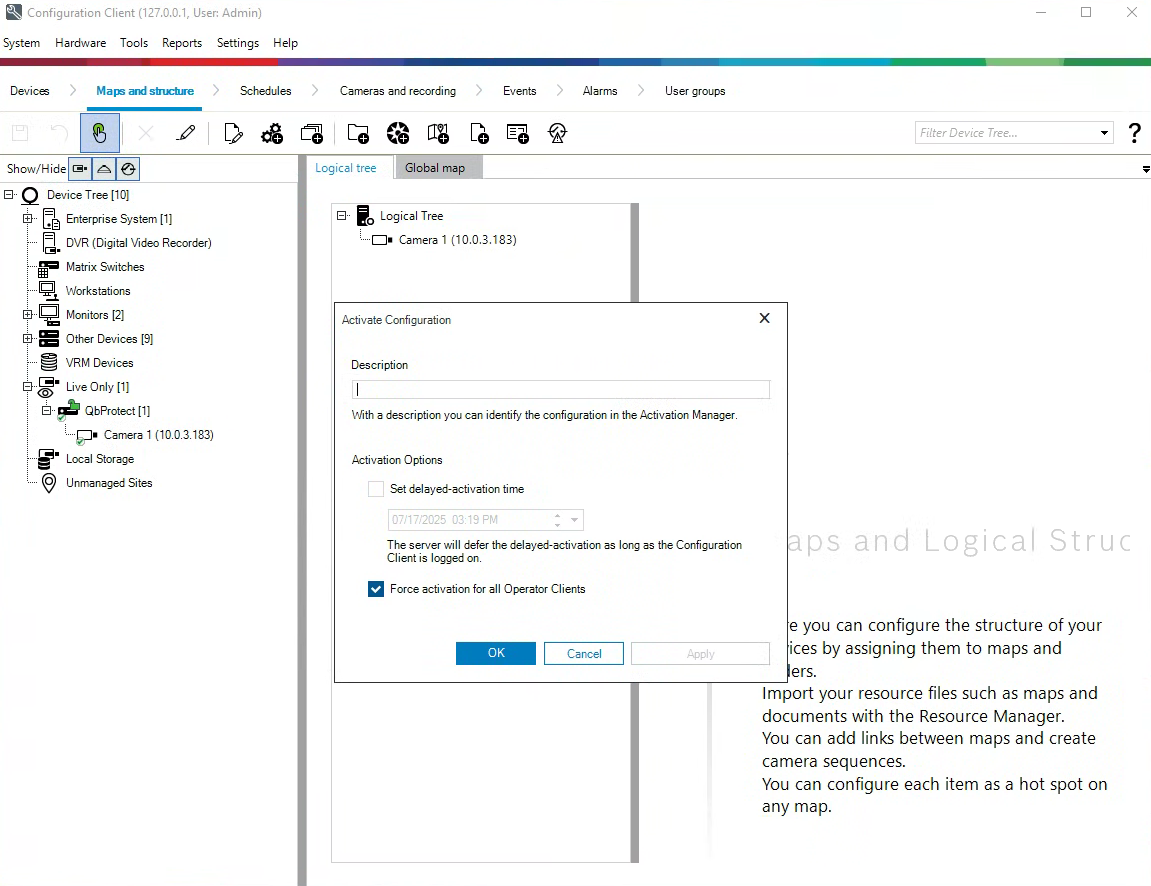 Figure 5. Adding QbProtect into Bosch BVMS: adding QbProtect to the Logical Tree
 -
Click
Saveicon → ClickActivate Working Copy of Configuration→ ToggleForce activation for all Operator Clients→ ClickOK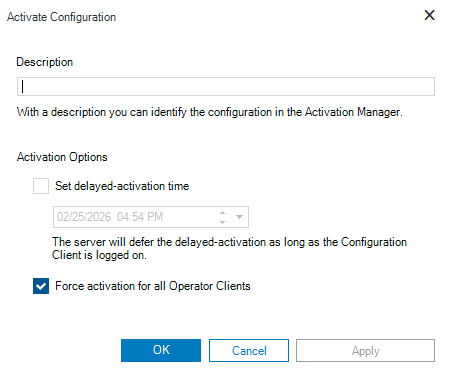 Figure 6. Adding QbProtect into Bosch BVMS: force configuration activation
 -
Launch the BVMS Operator Client and login using your BVMS password
-
Drag and drop
QbProtectcamera from theLogical Treeto theImage Pane→ The live preview of the point cloud should be available in theImage Pane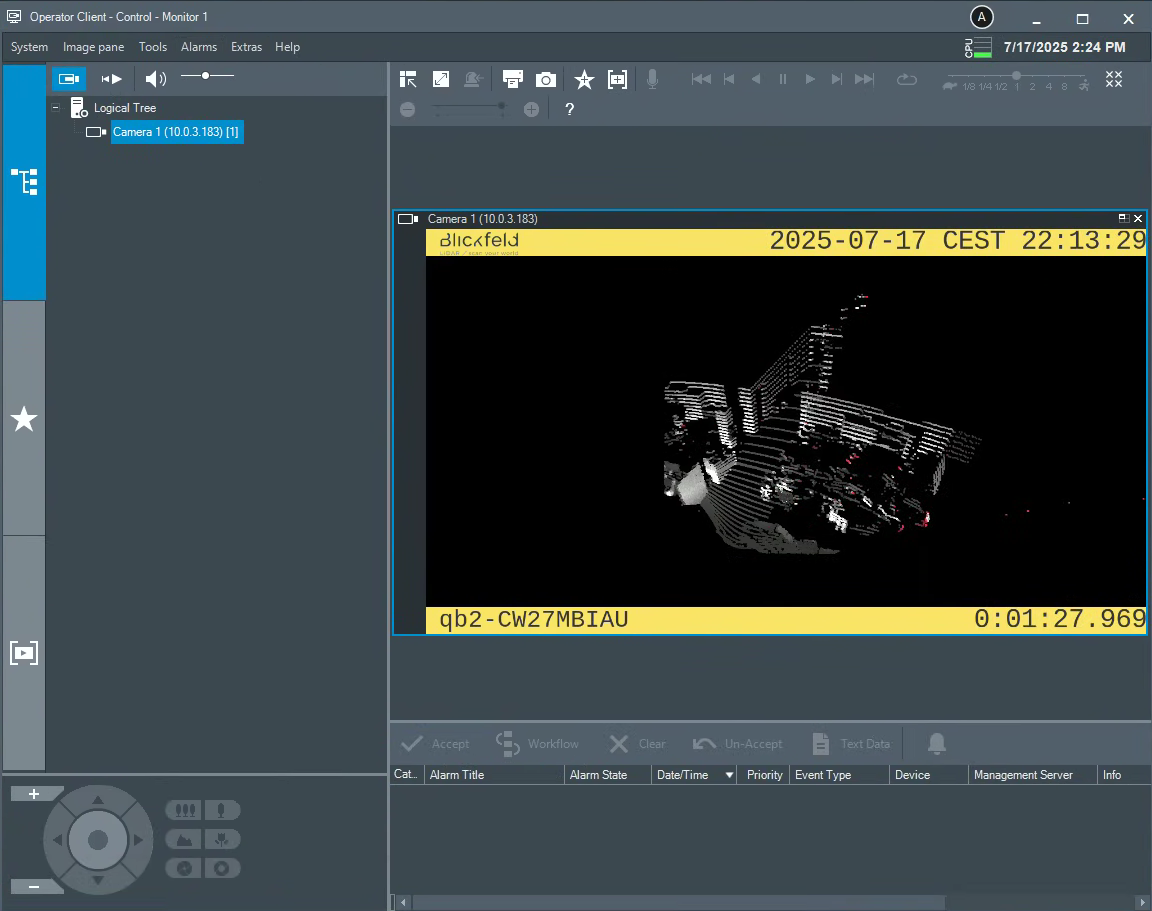 Figure 7. Adding QbProtect into Bosch BVMS: live video stream in BVMS Operator Client
|
The perspective of the RTSP video stream in VMS can be synchronized with the one configured in the WebGUI. For that, navigate to the Viewer page of the QbProtect WebGUI, configure the desired view perspective, and apply the keyboard shortcut Shift+V. |
The live video stream of the QbProtect point cloud can be accessed and observed in Bosch BVMS Operator Client after successfully completing the required steps above.
Events
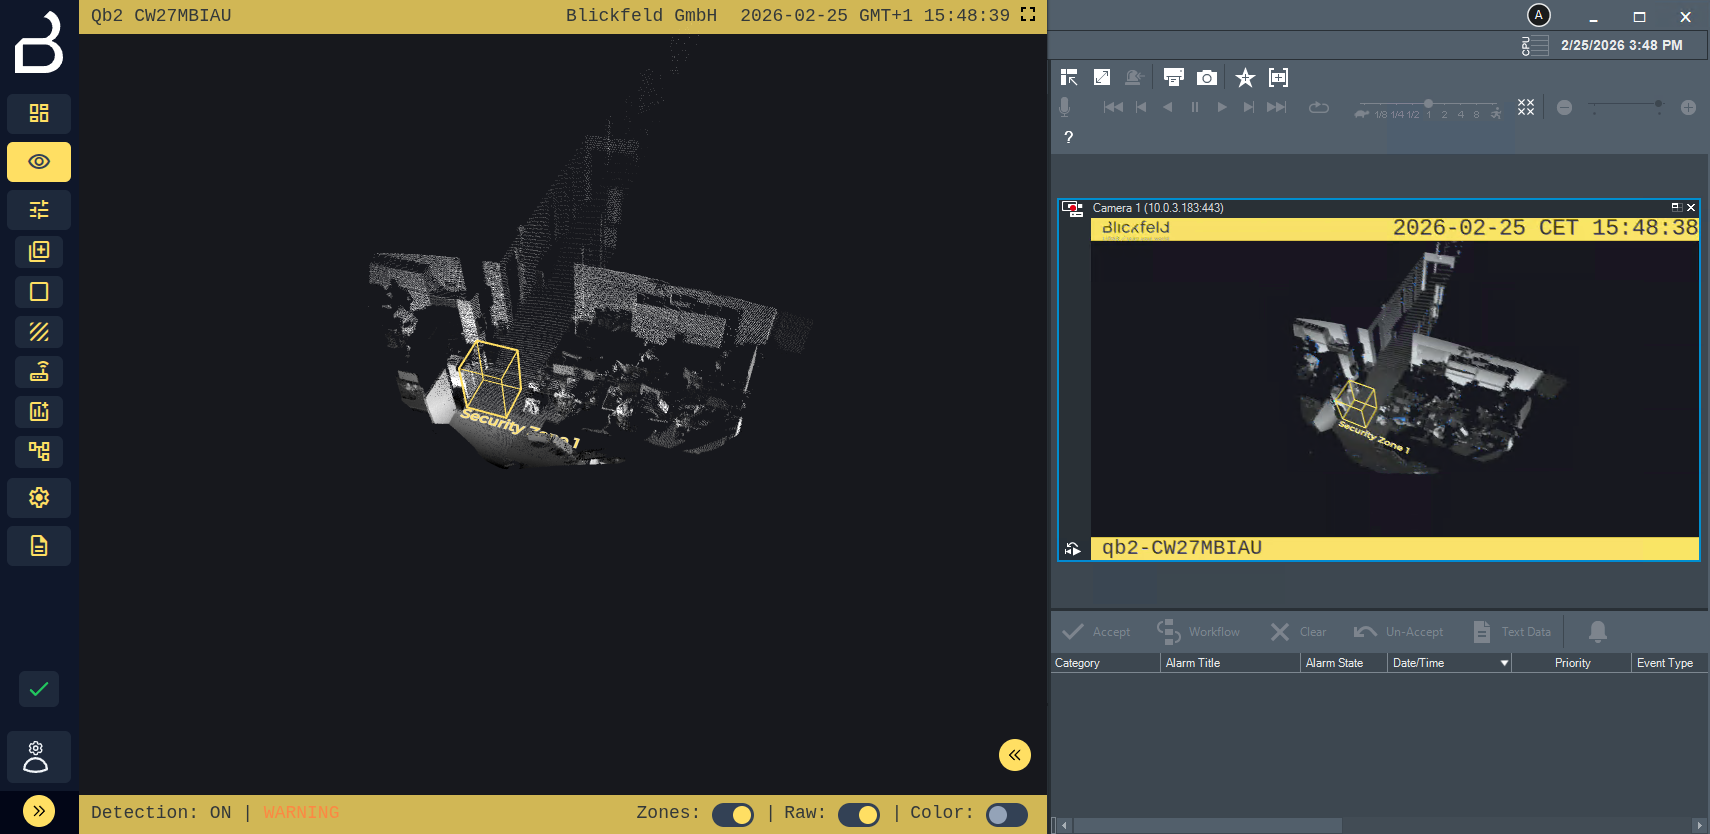
The example below shows how QbProtect events can be used to trigger alarms and record a video stream in Bosch BVMS. After QbProtect has been added to the Bosch BVMS, it can be configured to use QbProtect events for alarm generation. In this example, one security zone Security Zone 1 has been configured using QbProtect WebGUI to exemplify the configuration process, as shown in the Figure below.
|
Please refer to the Events subsection to learn about the available ONVIF event topics. |
Configure Events Handling
The events configuration procedure includes the following steps:
-
Launch the BVMS Configuration Client and login using your BVMS password (optional)
-
Navigate to
Devicestab → Navigate toVRM Devices→ Select configured Pool under VRM IP address (in this examplePool 0) → Navigate toStreaming Gateway→ Click on the addedQbProtectdevice -
Navigate to
ONVIF Encoder Eventstab → Toggleretrieve ONVIF events from ONVIF encoder directly -
Click
Plusto create a new mapping table → SelectBLICKFELD GMBHfrom the list -
Click
Onvif Generic Data 01in theEvents and Alarmstree → ClickAdd row→ The list of supported events should be shown in theONVIF Topicdrop-down list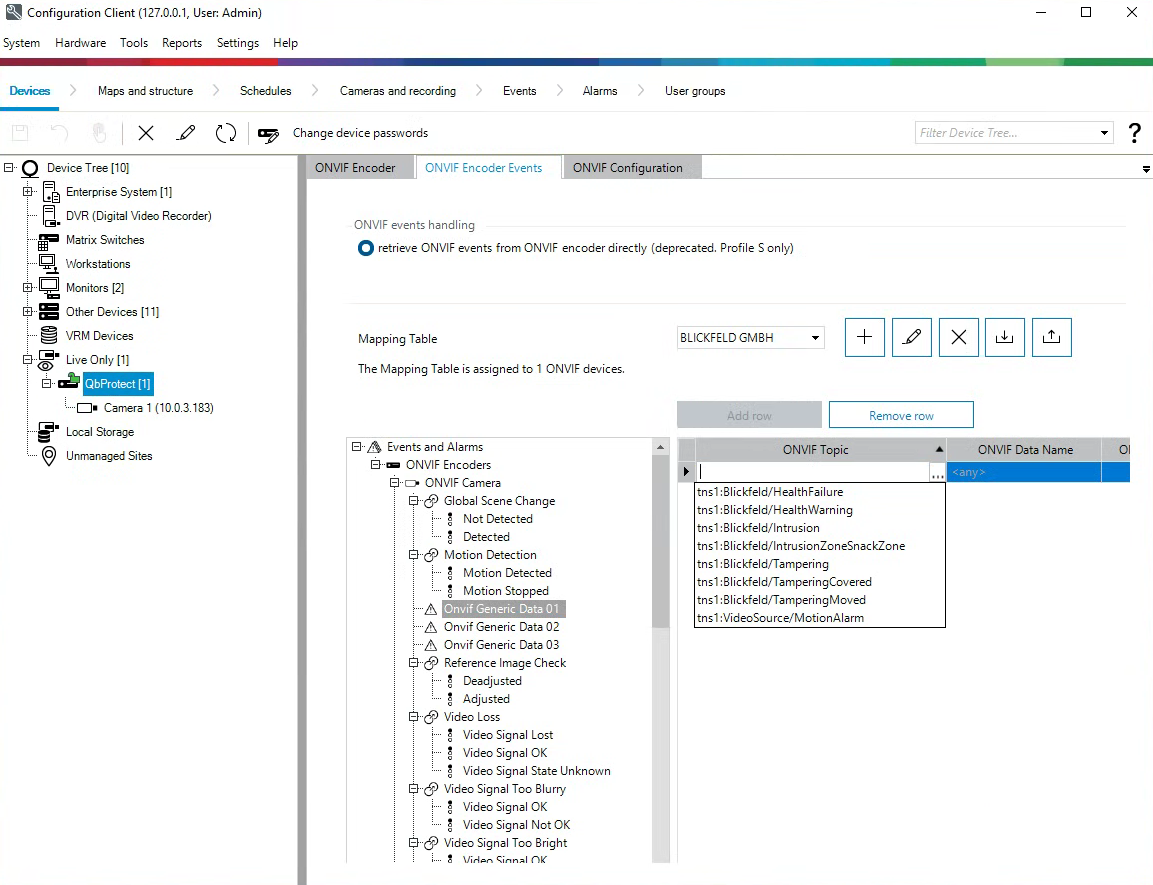 Figure 9. QbProtect events: ONVIF events list
Please re-open BVMS configuration client to populate the event list with event topics from security zones, which have been added in WebGUI once the device was already integrated into BVMS.
-
Set
ONVIF TopictoIntrusionZoneSecurityZone1from the drop-down list → SetONVIF Data NametoState→ SetONVIF Data Typetoboolean→ SetONVIF Data ValuetoTrue→ ClickSaveicon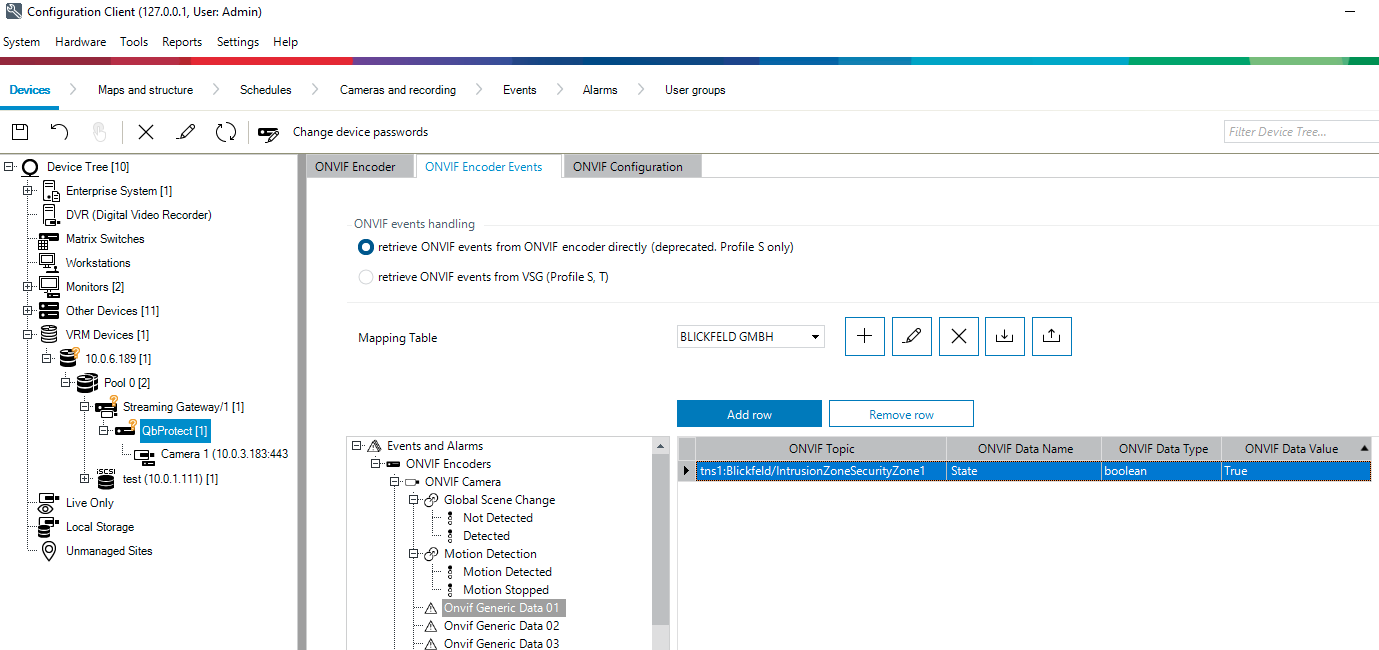 Figure 10. QbProtect events: ONVIF events configuration in Bosch BVMS
 -
Click
Activate Working Copy of Configuration→ ToggleForce activation for all Operator Clients→ ClickOK
Configure Alarm Rule Chain
The Bosch BVMS alarm rule chain consists of event source and event action. It allows to map a dedicated action (e.g., a particular alarm, recording of the video stream, etc.) to the event of the particular type (e.g., motion, zone intrusion).
The alarm rule chain configuration procedure includes the following steps:
-
Navigate to
Eventstab → ClickONVIF camera→ ClickOnvif Generic Data 01→ ClickSettings for Onvif Generic Data 01→ Set schedules forTrigger Alarm,LogandScripttoAlways→ ClickSaveicon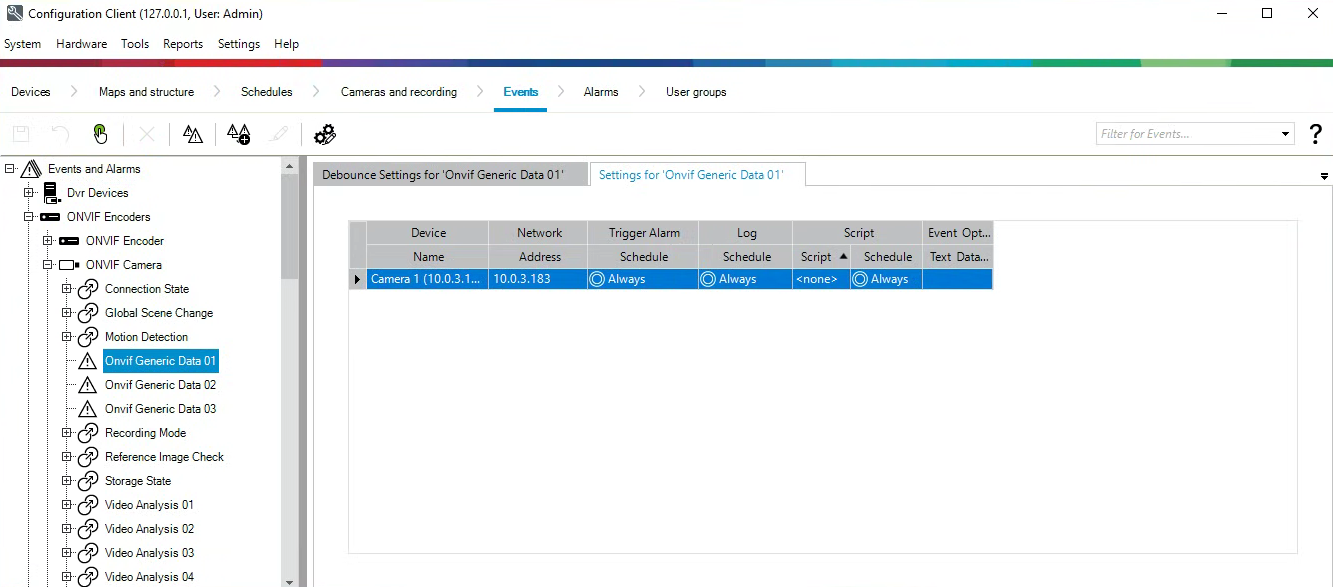 Figure 11. QbProtect events: events schedule configuration in Bosch BVMS
 -
Navigate to
Alarmstab → ClickONVIF camera→ ClickOnvif Generic Data 01→ SelectQbProtectinCamera1ofAlarm Image Panes→ ToggleInstant Playback→ ClickOK -
Assign a meaningful title and color to the alarm, e.g.
Zone Intrusion→ ClickSaveicon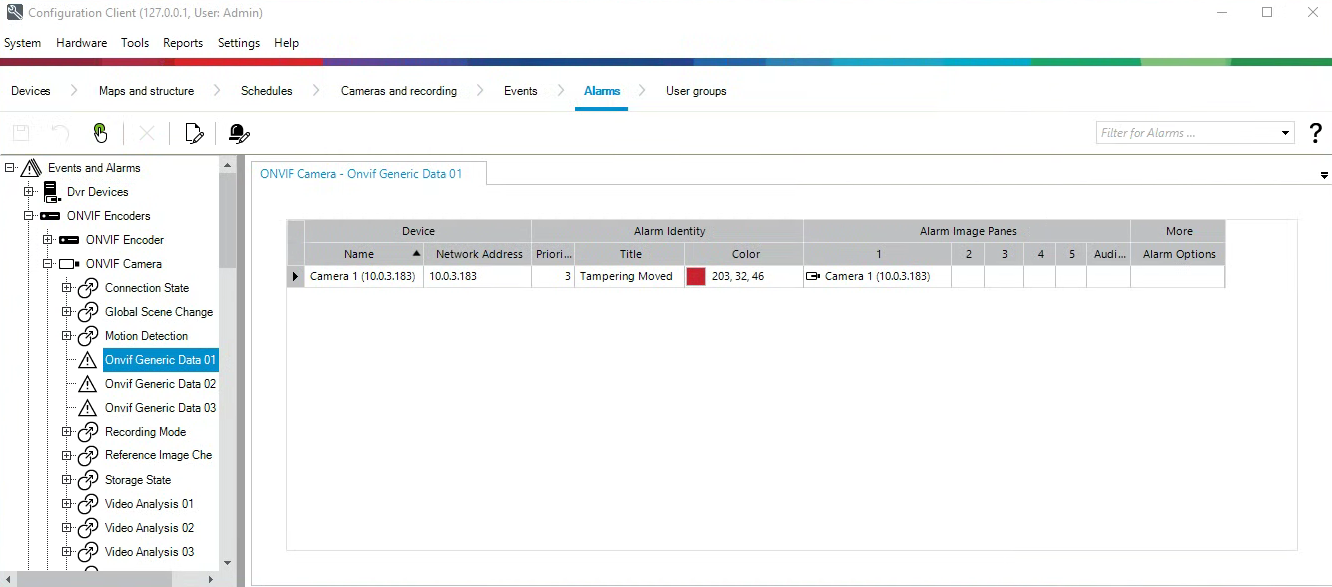 Figure 12. QbProtect events: alarm configuration in Bosch BVMS
 -
Navigate to
Cameras and recordingtab → ToggleVSG→ Selectmedia_profileinStream 1pane → SelectStream 1 (via VSG)inLive Videopane →Click `Saveicon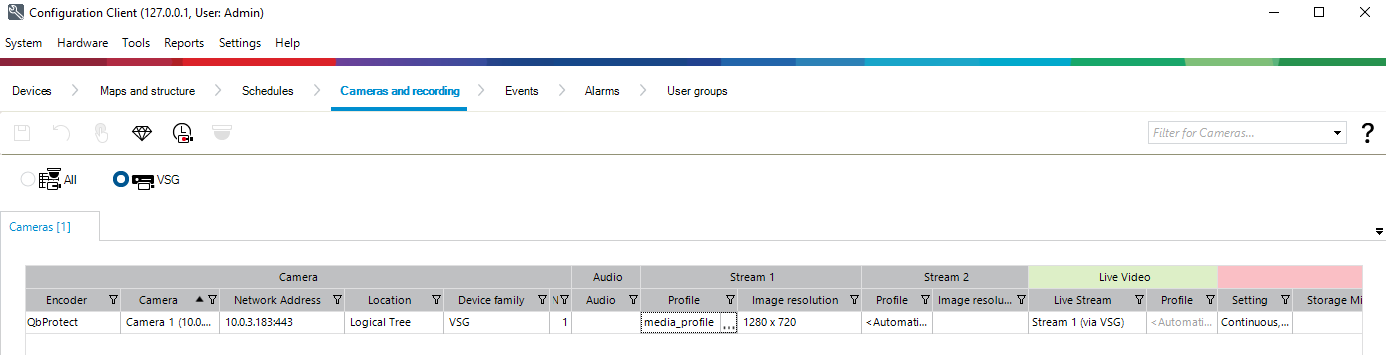 Figure 13. QbProtect events: recording configuration in Bosch BVMS
 -
Click
Activate Working Copy of ConfigurationIcon → ToggleForce activation for all Operator Clients→ ClickOK→ Wait untill BVMS Operator Client restarts -
The zone intrusion event in the
Security Zone 1from QbProtect and the configured intrusion event rule chain will be generating an alarm in BVMS Operator Client (Live View), as shown in the Figure below.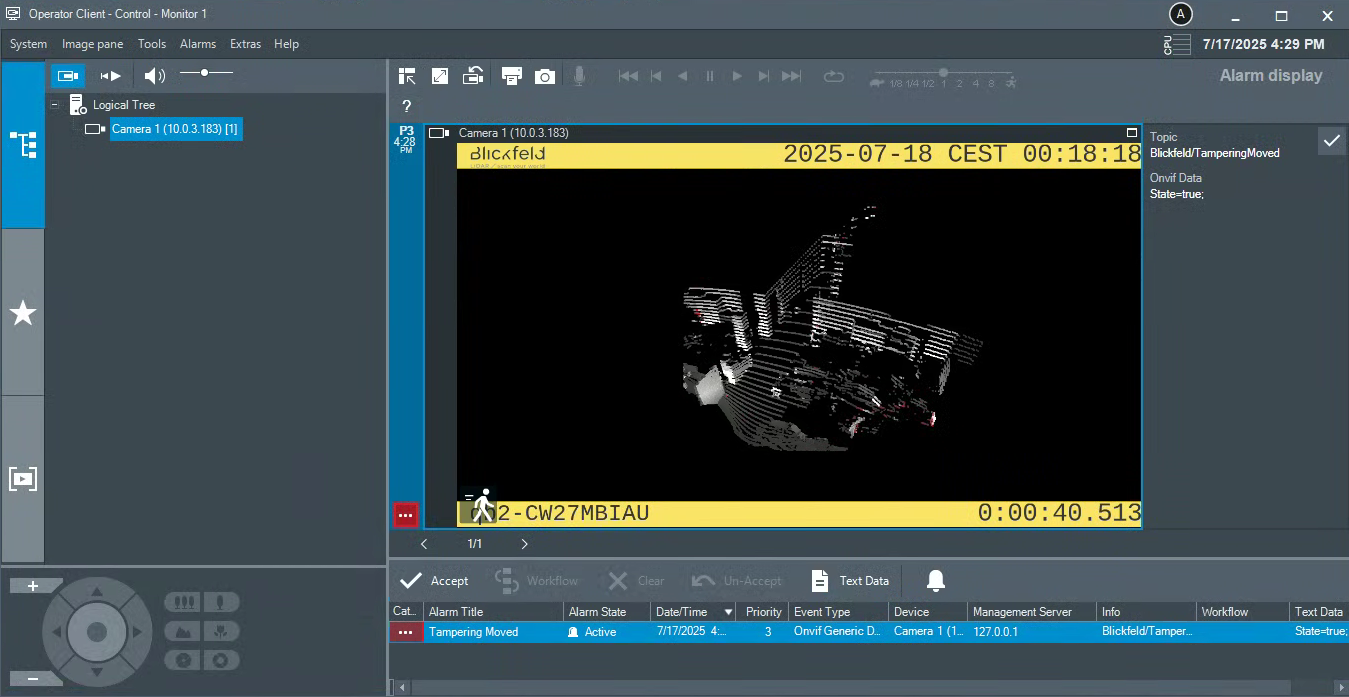 Figure 14. QbProtect events: ONVIF intrusion event in the security zone raises alarm
 -
The recorded timeline can be found under the
Playback Mode Figure 15. QbProtect events: recorded video timeline